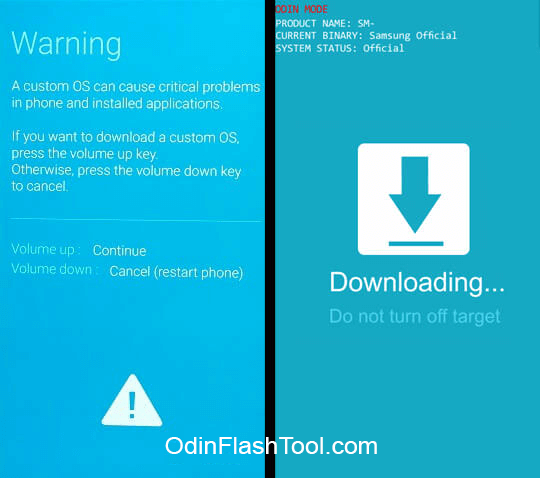
Odin Flash Tool or Odin Downloader is a tool designed to Flash Stock Firmware, Custom Firmware, CF Auto Root, Custom Recovery and other files on any Samsung Device. On this page, we are going to share a detailed guide on how to use Odin Flash Tool to flash Firmware, Recovery Images and Root File etc.
Note: Flashing Stock ROM on Samsung device doesn’t void its warranty, but flashing Custom Firmware, Root File, Custom Recovery or any patch file will void its warranty.
Pre-Requisites:
- Backup your important data.
- The device must have at least 70% of battery juice left.
- Enable
USB Debuggingon your device fromSettings->Developer Options. IfDeveloper Optionsis missing or not enabled, then go toSettings->About Phoneand tap onBuild Numberfor about 7-10 times. Unlock Bootloaderas installing CF Auto Root, Custom Firmware, Custom Recovery, and other patch files require an unlocked bootloader. Otherwise, it may brick your device.- Kill Samsung PC Suites like
Samsung Kiesetc. So, they won’t interfere with the Odin Downloader.
How to use Odin Flash Tool to Flash Stock ROM and other files:
Step 1: Download and install Samsung USB Driver on your Computer (If installed already then Skip this step).
Step 2: Download the latest version of Odin Downloader or the one supported by the device and firmware.
Step 3: Make sure the files you want to flash are downloaded on your Computer.
Step 4: Power off your Samsung device and boot into Download Mode/ Odin Mode. To know how to boot Samsung device into Download Mode, follow the instructions here.
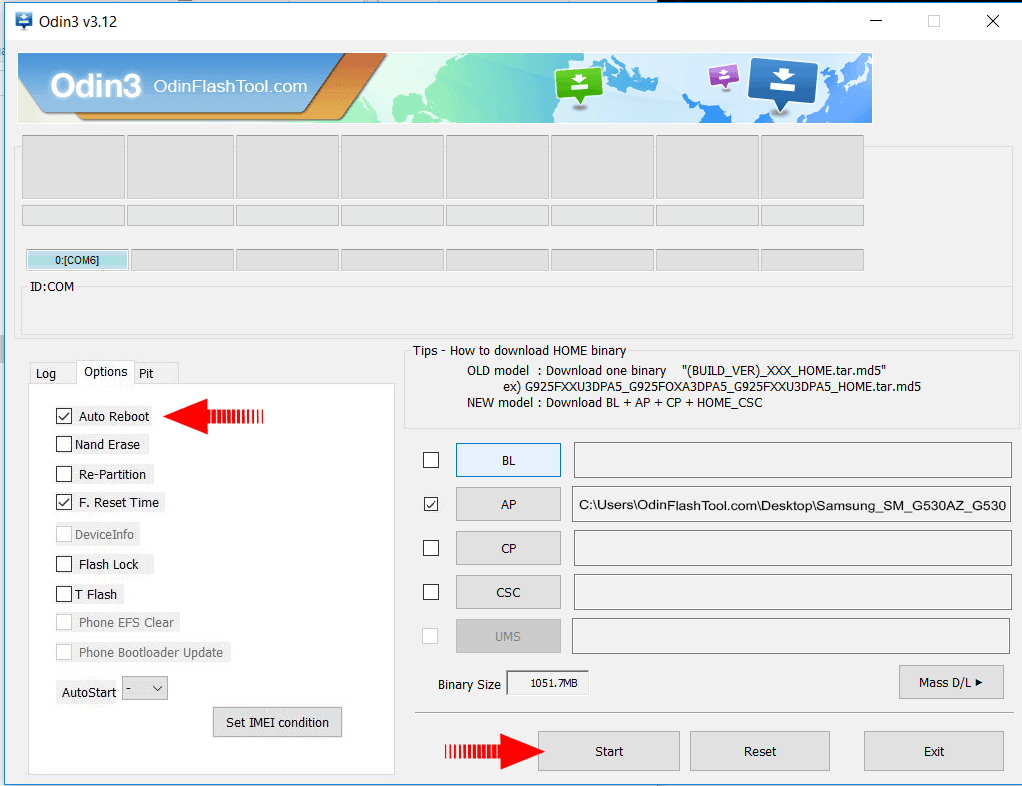
Step 5: Run Odin3 .exe file and connect your device to PC. Once the device is successfully connected you will see Added! message in the Log tab. Also, you will see COM Port under ID:COM.
Step 6: Click on AP or PDA and choose the firmware file. If you are installing Custom Recovery, Root File then choose the file with .img or .tar or .tar.md5 format.
If you are flashing firmware files then choose the files as listed below:
- Click on
APorPDAand choose the file withAPin its name or choose the file which is large in size. - Click on
CPorModemand select the file withMODEMin its name. Ignore this step if no such file exists. - Click on
CSCand select the file withCSCin its name. Ignore this step if no such file exists. - Click on
PITand select the.pitfile. Ignore this step if no such file exists. - Click on
BLor Bootloader and select file withBLin its name. Ignore this step if no such file exists.
Step 7: Now under Options, choose Auto Reboot and F.Reset time and un-check all the other options. Check Re-Partition only if you have selected the .pit file.
Step 8: Once all the steps are followed properly, click Start to begin the flashing process. During this time don’t unplug the device as it will permanently brick your device.
Step 9: Flashing process may take up to 7-10 minutes and once it is done you will see PASS! message. Your device should reboot automatically, if not disconnect and reboot manually.
Step 10: If your device is stuck at Samsung Logo for more than 10-15 minutes after the flashing process, then ‘Wipe Data/ Factory Reset‘ from Recovery Mode.


Added!!
Odin engine v(ID:3.1301)..
File analysis..
All threads completed. (succeed 0 / failed 1)
I am having the same issues:
Added!!
Enter CS for MD5..
Check MD5.. Do not unplug the cable..
Please wait..
Checking MD5 finished Sucessfully..
Leave CS..
Odin engine v(ID:3.1301)..
File analysis..
Total Binary size: 1433 M
SetupConnection..
Complete(Write) operation failed.
All threads completed. (succeed 0 / failed 1)
Enter CS for MD5..
Check MD5.. Do not unplug the cable..
Please wait..
Checking MD5 finished Sucessfully..
Leave CS..
Odin engine v(ID:3.1301)..
File analysis..
Total Binary size: 1433 M
SetupConnection..
Complete(Write) operation failed.
All threads completed. (succeed 0 / failed 1)